Saturday 28 February 2015

Art Bead Scene February Inspiration Challenge

The ABSblog inspiration for this month’s challenge was this beautiful watercolour piece, called Amapolos. It was created by Edward Julius Detmold in 1913. There are shades of coral and cream that dominate the work, with the coral varying from pale and toned down to bolder and saturated. The creamy parchment background brings a calming influence to the artwork. The variation in tone is slighter with a more muted somewhat grayish cast when compared to pure cream.


Amapolas Watercolor, by Edward Julius Detmold, 1913, 208 by 124mm
Published in “News of Spring and Other Nature Studies”

I was very inspired by the colours used in this painting and put together many pairings of art beads and supporting beads, chains, cording, etc. I was only able to complete 2 pieces, so now, I have many inspirations to use in the future – at least until I decide I need to clean off my work bench again. Without further delay, here’s the first piece I made:


Early Spring Necklace

Ironically, the first piece I made did not even use cream or coral in the design. The jumping off point was these two ceramic focal flowers made by Natalie McKenna of Grubbi. The pendant focal is a lovely rose outline with shades of brown and green for a rustic, grungy look. The seafoam green ceramic flower hides the lobster claw clasp, giving a nice finished look to the piece.

Larger Zebra Jasper beads, glass aqua green and rough cut variegated beads were selected to complement the lovely focal flowers. I used an antiqued brass chain to bring a lighter feel to the necklace and finished it off with antiqued bronze wire for the pendant bail and centre of the clasp flower.  When I posted this piece on Pinterest and in my online shop the necklace was 24” long but didn’t quite feel right. I have brought the length down to 22” and it makes a huge difference, especially since the pendant hangs down another 2”.

My second piece is this pretty necklace:

Lovely HibiscusNecklace

The pretty porcelain hibiscus flower from Suburban Girl Studio is highlighted in a soft pinkish coral. The lovely creamy ceramic shines under the glazed top coat.  Fire polished faceted glass beads in a yellow red colour combination are a supporting element for the pendant. Pulling from the leaf shades again I added faceted fire polished glass beads in an OP green lustre colour.

Black leather cording adds a grounding colour to the necklace. I decided to finish it off with 2 copper plated and patinated feathers from Stinky Dog Beads, along with one more of the yellow red glass beads. These hang from an antiqued brass chain made from jump rings. The final touch is the use of antiqued gold plated clasp and bail.


Thursday 26 February 2015

Fusion Beads 30 Day Bead Challenge

This March, FusionBeads.com is running a brand new 30Day Bead Challenge to celebrate National Craft Month!


A new project is scheduled for every day. Check out the Challenge Calendar below and online. They encourage everyone to start preparing projects ahead of the scheduled day.


The first challenge is a favourite of many artisans – a pair of fabulous earrings!

There are lots of inspiration ideas on the Fusion Bead website to help you get going. Share your creations on their Facebook link, and in your own blog or site. See what other artisans are posting too.

I am giving the challenge a try. It will be interesting to see if I succeed in posting every day. I haven’t yet figured out how I will present everything on my blog but am bouncing a few ideas around. Come back on March 1st and every day throughout March to have a peek.

 Note: I am not affiliated with nor do I have a relationship with Fusion Beads. I just thought this would be fun and all opinions and comments are my own.

Have a Great Challenge!

Monday 23 February 2015

Metal Clay Arts Magazine

Of all the artisans interested in or working with metal clay, I think I was one of the last people to find out what happened to them. To make a long story short, their newsstand distributor went bankrupt and they were out more than 9 months of revenue from individual store / newsstand sales. In addition the Spring 2014 issue had just been sent to the distributor – paid to produce and send, no chance of revenue.

The story goes on and on. You can read about it here.

There are also some volunteer run auctions. One closed on February 8th and the second one will close on February 28th at midnight PST.

Being the skeptical type I finally did some research into the claims and came across the overwhelming support of the metal clay community, mentioned above.

I had purchased some magazine back issues in December and have decided to let that order stand. I’ve been advised they will be delivered, on a delayed basis. (Update Feb 23 7:45 PM. The shipment for my magazine order was received today. Happy Day! These folks are trying really hard and I'm extra happy to support them)

I also have a brand new Stainless Steel Pan that I am donating to the auction. I had acquired it last summer in a clear out sale. I didn’t have a kiln yet, was planning ahead. Since that time I’ve decided to go with a mini kiln (yes I still don’t have a kiln).


The pan is 7.5"L x 6.375"W x 4.125"H and holds 2lbs of carbon. Purchased for $19 US. I will donate the shipping price.


Friday 20 February 2015

We’re All Ears February Inspiration

This month’s earring design challenge was focused around some absolutely beautiful artwork - watercolour illustrations that have been paired with flowers.

Malaysian artist / photographer Lim Zhi Wei, known as Limzy, created these whimsical flower girls. Limzy turns everyday objects into delicate beautiful art. She has published a very limited run of a 2015 calendar with her flower girls. I was so enamoured with these pretty creations that I ordered a calendar for myself. You can follow Limzy on Instagram and Facebook or on her blog, Love, Limzy.

I chose this flower girl for my inspiration:


I have tiny handmade Polymer Clay Plumeria flowers that are a close match to the skirt on this girl’s dress.  These flowers have the charming name “The Ocean Blooms with Happiness”. 


I paired them with Brass Tea Leaves Enameled in Cobalt Blue. Brass wire binds everything together and is used to hang the earring from Brass Ear Wires. The idea was to use the enameled leaves as the body of the dress and the flowers as the skirt. I wanted to use more flowers for the skirt but did not have enough. I’m still trying to source more. If I find some I will add them to the earrings. (These earrings are now sold)


Congratulations to Erin Prais-Hintz and all the contributors for the Earrings Everyday blog. This month’s inspiration marks the 1st anniversary of the challenge.


Thursday 19 February 2015

Polymer Clay Challenge – Month 2

Continuing my goal of 1 new Polymer Clay project a month, here’s my month 2 creation:


Two different molds were used to get the textures. Most of the bottom disc is hidden but it could easily be a focal on its own. I was trying to give an image of birds flying high in the blue sky, soaring over fields of wheat and grasses far below.


I made the two sets of discs several weeks ago and used alcohol inks to add the brown, green and blue. Then they sat and waited while I dealt with other things, until 2 days ago that is.

I took them out of their dust protector yesterday. Looking at the discs with fresh eyes I wasn’t thrilled with the darkness of the green and brown colours so, grabbing some rubbing alcohol, I started dabbing them off with a fine tip brush and…oops, dabbed off too much. So I mixed some more of each colour with rubbing alcohol and added some back.

Next came the blue. The original colour was okay except that the sky and the birds were blue. I used a neutral grey ink to colour the birds, and a bit of gold to brighten the tiny beaks.

I had the idea to make tiny domed beads to go with the focals and used some of the lighter blue and the copper that I made the wavy disc beads with last month. Since I mixed up a little too much (about 20 times more than I needed), I also made 2 beads with a rough circular shape.

The idea was the little domed beads would be attached to ear studs with built in loops, the rough ball beads would hang from the loops and the focals from the ball beads, kind of like this:


Into the oven everything went. I had used a transparent polymer clay for the 2 sets of discs. When all came out the bird discs looked…blah…flat looking without texture. Plus the colours of the domes and rough beads did not work with the discs. I put those aside to use another time.


I read somewhere that someone (can I be less vague?) had used pencil crayons to bring colour to their clay beads. Wanting to finish up my experiment I decided to do the same and used a deep blue to make the sky texture stand out, then a white to brighten the birds with just a touch of black here and there. Finally, a gold to colour was added to the tiny beaks and everything was sealed with Ren Wax. Those were really tiny beaks and the colours went over a bit.

Now I wish the birds were a little brighter but trying to do that will be a project for another day. The lopsided connection of the two discs is something that can't be corrected now. Like my first polymer clay experiment, these are staying with me.

Monday 16 February 2015

Making a Light Box

Right from when I first started making jewellery I knew I wanted to have photos of the pieces I made; to use in a blog, for an online shop, for a record of what I made, and so on.

Taking those photos has been a challenge. Getting the right light, background, display set up. This is something pretty much all small business artisans have struggled with.

When I started out I simply draped a piece of velvet or satin cloth over a chair. Eventually I learned about lighting, which just could not be done effectively with this set up. So I went online…and came out of the search with this little setup.


Sad to say, I cannot remember where I found the instructions, or who the author was. They did recommend using a larger box and lining it with white fabric. I was impatient though and did not have a larger box. I also didn’t want to cut up my satin and didn’t have  white fabric that was sheer enough anyway, so I went with white printer paper. It worked well enough but there was always a grey cast to the photos, visible above too even though I haven’t cropped the photo.


Eventually the size and grey shading just became too much to try to deal with, so I made a new box, this time using fabric instead of paper.


Not wanting to glue the fabric to the box or ending up with heavy fold lines, I decided to sew a fabric “box” to use within the cardboard box. My plan was to make the fabric a little longer on all sides and fold the extra length over the outside of the box. It worked in principle, except, I didn’t measure right and it wasn’t tall enough. Still, I used this set up for a long time.


Last summer the cardboard box started to collapse until eventually it was not usable anymore. I guess I cut the openings too large. The remaining frame didn’t have the strength needed to maintain the shape.


Back online I went again and came up with this solution


This time I kept the link. You can find information here. It was a great concept and was working well. I loved that is was very portable and began to take photos outside. I went on a jewellery photographing spree and quickly came to realize the aluminium foil does not do well with jewellery. The wire, edges of crystals and beads and clasps all left scratch marks. The foil was looking rough very quickly. So I started using the same white fabric from the back on the flat surface


That worked better to a point. The “fabric” I was using is actually a specialty pattern tracing fabric. It’s designed to withstand tearing but is somewhat sheer.

Along came winter and I was back inside taking photos. I just took the fabric from my collapsed box and draped it over a couple of drawers from my desktop storage units.


These photos ended up with a very wrinkled background which didn’t always look the best. 

Back online I went (again) and found instructions for this light box


Although it’s not quite finished I thought I should try it out for size, and laughed at the scale once set up


Left like this I could easily do several set ups at the same time. It does make the light box hard to use though, since it’s larger than most available surfaces. I will resize it a bit, but not today. Once that’s done the fabric will go over the open squares and I’ll add the recommended glass surface for a stage.


One final shot shows the camera porthole available at the top. The camera on top is the one I use for my jewellery photos, a little Fujifilm CMOS. (I used my iPad to take this photo) 
I don’t recommend resting the camera on the box. Although strong the foam board still bent under the weight of my little camera.

Friday 13 February 2015

Today's the Day! Online Auction Starts at 5:00

The excitement happens today!


Auction starts at 5:00 PM and runs until 10:00 PM.

Join the auction. Check out all the products available to bid on. There will be a wide variety of products and services to bid on.

Have fun bidding on what you want!

Thursday 12 February 2015

Gone to the Birds

For the second year in a row, this has turned out to be a very cold winter. We tend to have a lot of bird visitors in our yard, partly because we have the pond, at the back by the pine trees, where they can get fresh water (it almost never freezes overs) and partly because there are many types of trees, bushes, grasses, and nooks and crannies for the birds to take shelter in.


The feeder is hung on a rope strung from a large blue spruce, across the yard to a birch tree, and across to the arbour roof on our deck. A better solution is on the list for next year.


We put up a bird feeder for them. The feeder was made by my son and husband some 20 years ago. It was in storage in a cupboard in the garage for a long time. I finally convinced my hubby we should put it out again, especially since the snow was getting so deep again.


We also put out a block of seeds. I’m not sure how to describe it other than to say it’s a hard block of packed seeds. It was put on top of an upside down bucket near the bird feeder.


 I have tried and tried to get photos of all the varieties of birds that stop by, but no luck yet.


We came to realize the squirrels are doing a great job of jumping on the bird feeder, stealing seed and flinging what they don’t eat all over. As soon as the weather improves a bit there’s a collection of plastic bottles, with holes in the bottom, waiting to have that cord strung through them…

And just to finish off, I thought I’d give you a look at a necklace made to match the Shimmer and Shine Bracelet purchased by a loving husband just before Christmas.


Shimmer and Shine Necklace

Monday 9 February 2015

Shop Sale on Now plus More Online Auction Details

Online Shop Sale

To celebrate the month of February, a pretty special month what with Valentine’s Day and Family Day in many Canadian provinces, I am having a sale in my online shop.

Effective now and until the end of the month, everything in my shop is on sale. Get a 15% discount on all items purchased, and best of all, you don’t have to do anything. The sale price shows up on every item, just add them to your cart.


Online Auction February 13th

On Friday I blogged about an online auction with The Savvy Shop Stop. I am trying it out for the first time. I thought I would show you what I am offering in the auction. Please note, these items are not available in my shop:


Pagoda Bracelet

The Pagoda Bracelet is a mixed metal bracelet with copper and bronze pointed “pagoda roof” links, silver plated spacers, and ceramic beads. The bracelet closes with a bronze filigree toggle clasp.

Bracelet length approx 7 ½ inches (190 mm). Fits 6 to 6 ½ inch wrist. Can be adjusted for size if required

Copper and Antiqued Brass Pagoda links ¾ x ¾ x ¼ inches (19 x 19 x 5 mm)
Ceramic Rondelle Beads in green, beige and blue ombre effect ¼ x 5/16 inches (5 x 7 mm)
Silver Plated Spacer Beads approx. ¼ x ¼ inches (5 x 5 mm)
Bronze Filigree Clasp 7/8 x 7/8 inches (22 x 22 mm) outside with Toggle 1 1/8 x 1/8 inches (28.5 x 3 mm)


Ombre Garden Earrings


The Ombre Garden Earrings are made with glass Tilla beads using 4 shades of green to give an ombre effect, with Czech glass flowers in a deep taupe and a pressed glass variegated green leaf dangling from the bottom. Everything was strung on copper wire, attached to copper lever back ear wires.

Earring length approx 2 ½ inches (63 mm) from top of ear wire to tip of leaf
Tilla Beads approx ¼ x ¼ inches (5 x 5 mm)
Czech Glass Flower ½ x ½ inches at widest point (13 x 13 mm)
Czech Glass Leaf approx ½ x ½ inches at widest point (13 x 13 mm)


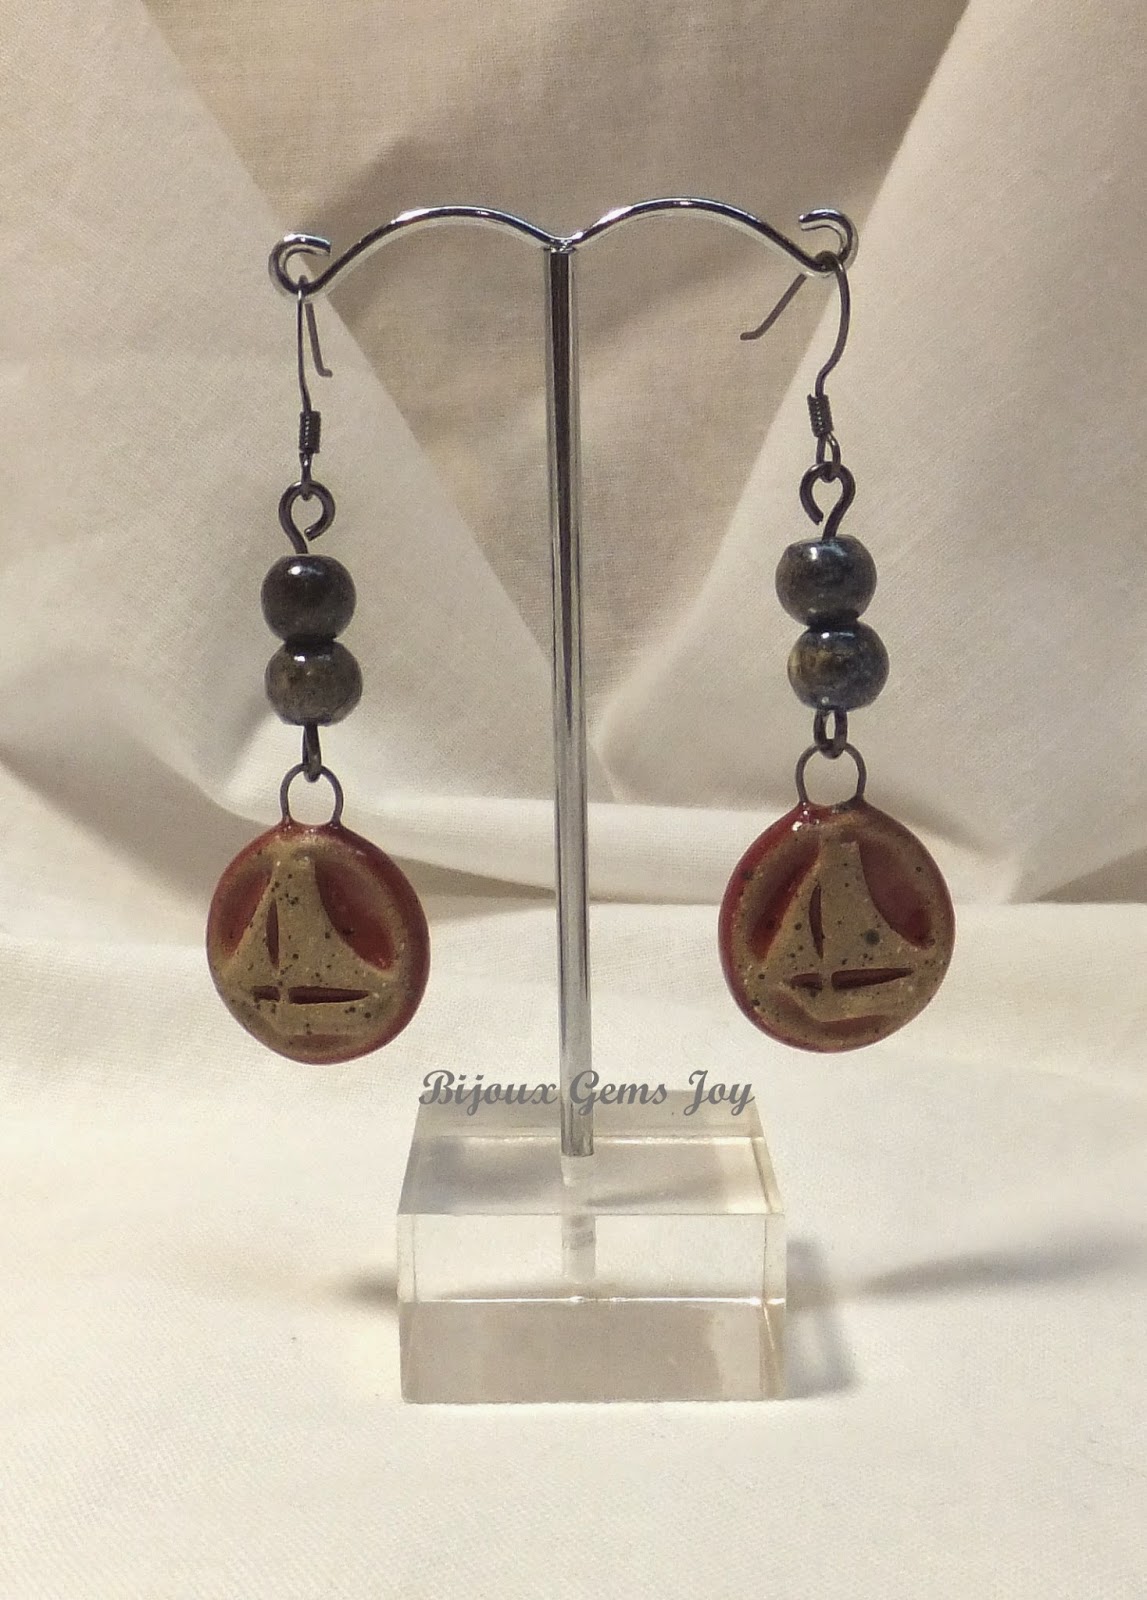
Let’s Go Sailing Earrings

Pretty little sailboat beads made of stoneware with a deep red glaze are the focal of these Let's Go Sailing Earrings. They were made by Diana Ptaszynski of Suburban Girl Studio. To me they scream Marsala, this years’ “it” colour. The stoneware colour peeking through is like a darker version of the beige-like Toasted Almond colour. I used ceramic beads in variegated blue and matching beige colours, copper wire with a steel blue coating and Gunmetal earwires.

Earring length approx 2 ½ inches (63 mm) from top of ear wire to bottom of ceramic bead
Handmade Stoneware Sailboat Coin Beads with a deep red glaze ¼ x 5/16 inches (5 x 7 mm)
Handmade Ceramic Rondelle Beads in beige and blue ¼ x 5/16 inches (5 x 7 mm)


Blue Flash Necklace

The Blue Flash Necklace is a very pretty nautical inspired necklace, for which the highlight is the Blue Goldstone gemstone beads in 2 different sizes.  The Blue Goldstone is complemented by absolutely clear Quartz Crystal gemstones with a Sterling Silver chain and clasp to finish off the necklace. The necklace sits nicely with an elegant look

Necklace length 20 inches (508 mm) along longer
Blue Goldstone Beads: Large ½ inches (12 mm), Small 3/16 inches (4 mm)
Quartz Crystal Beads 3/16 inches (4 mm)


I hope you’ll check the auction out here. You might just find something perfect for you.

Thursday 5 February 2015

Online Auction February 13th


Finding new venues and getting new exposure is always a goal for any artisan. I just recently heard about this innovative (to me anyway) online auction coming up next week.


There will be many vendors participating from all types of handmade goods, other products and different types of services available to bid on.

I’ve decided to add 4 – 6 items to the auction. I want to get a feel for the participation and to get feedback from participants to my jewellery. It’s important to know whether I’m heading in the right direction with my art and I figure this is a new path to find out.

I hope you’ll check it out. You might just find something perfect for you.

Monday 2 February 2015

Trunk Show


This coming Friday, February 6th, I will be hosting a trunk show at my bill paying job location in Toronto Ontario. Geared to the season, I will be featuring Valentine jewellery along with jewellery that works for the season but is more subtle in its approach.


Here’s a sample of some of the more traditional Valentine jewellery that will be there. I will be posting new pieces to my shop this week. Look for the updates.


Have you considered hosting a trunk show or a home party? If you’re in the Toronto north area reach out to me. I’d be happy to discuss organizing an event.